
Connect Shopify with your own app
Create a Shopify app for your store, then use Install via Shopify to connect it to Lifter. You configure the app once for your Lifter gateway. Specialists can then connect through Shopify without copying access tokens.
This walkthrough uses Fresh Feels Lifter as the example app. Use your own store name, permanent Shopify domain and Lifter address when following it.
Before you begin
Section titled “Before you begin”You need:
- Shopify access that lets you develop apps and install them on the store.
- A Shopify organisation where you can create an app and choose its distribution.
- An Administrator account on your Lifter gateway.
- Access to the specialist that will use Shopify.
- An agreed list of what the specialist should be able to read or change.
Keep these two addresses separate:
| Address | Where you use it |
|---|---|
Your Lifter address, such as https://your-brand.lifter.work |
Shopify’s App URL and the start of its callback URL |
Your permanent myshopify.com domain |
Identifying the store when connecting a specialist |
Find the permanent Shopify domain under Settings → Domains in Shopify.
Your public storefront address, such as www.your-brand.com, is not the shop
subdomain that Lifter asks for.
1. Open the Dev Dashboard from your store
Section titled “1. Open the Dev Dashboard from your store”- Open the correct store in Shopify admin.
- Select Settings → Apps → Develop apps.

- The App development screen explains that new apps belong in the Dev Dashboard. Open the Shopify Dev Dashboard. If your store shows a dashboard button, you can use that instead.
- Select the organisation that will own the app. A collaborator’s development organisation can be different from the store’s organisation.
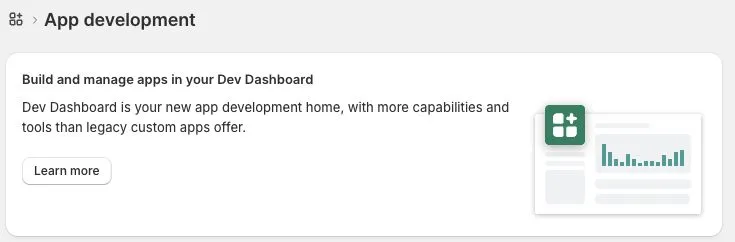
If the dashboard opens with 403: Forbidden, check the selected organisation and your app-development permissions. For a Partner account, you can select your organisation in the Partner Dashboard and follow its Dev dashboard link.
2. Create the app
Section titled “2. Create the app”- In the Dev Dashboard, open Apps → Create app.
- Use Start from Dev Dashboard.
- Enter a clear name, such as Fresh Feels Lifter, then select Create app.
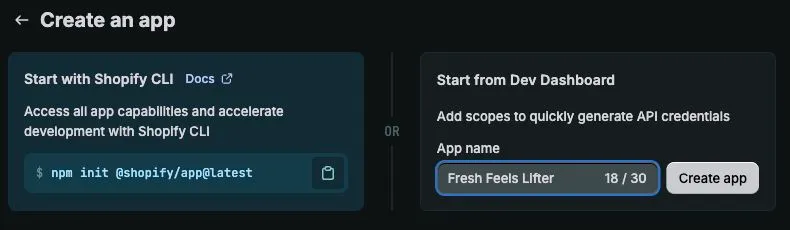
You do not need a Shopify CLI project for this dashboard walkthrough. If Lifter support manages your app configuration, coordinate later changes with them so an older configuration is not released over your dashboard changes.
3. Configure the app version
Section titled “3. Configure the app version”Shopify opens Create version. For an existing app, use Versions → Create version.
Enter these values:
| Field | Value |
|---|---|
| App name | Your app’s name |
| App URL | Your Lifter gateway’s public HTTPS address |
| Embed app in Shopify admin | Off |
| Preferences URL (optional) | Leave blank |
| Webhooks API version | The latest stable option offered by Shopify; the example used 2026-07 |
| Optional scopes | Leave blank for this setup |
| Use legacy install flow | Off |
| Allowed redirection URL(s) | Your Lifter address followed by /connectors/oauth/callback |
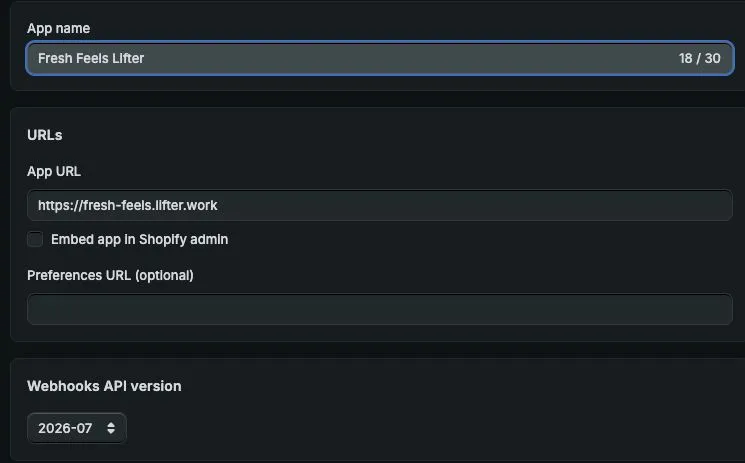
For the Fresh Feels example, the callback is:
https://fresh-feels.lifter.work/connectors/oauth/callbackReplace the hostname with your own Lifter gateway. Keep the exact path, HTTPS and no trailing slash. Do not use your Shopify storefront URL as the callback.
Choose the access scopes
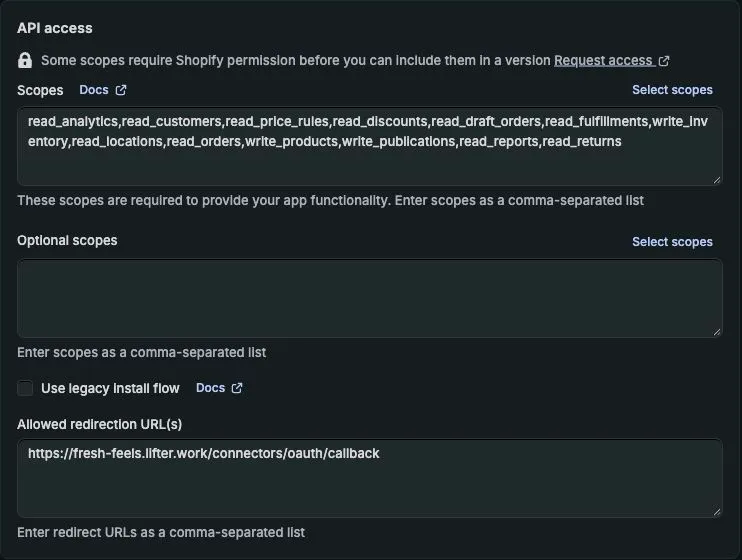
Section titled “Choose the access scopes”Scopes define what Shopify allows the app to do. Under Scopes, select Select scopes, choose Admin API, and search for the permissions you need. Select the relevant boxes, then choose Done. You can also paste a comma-separated list directly into Scopes.
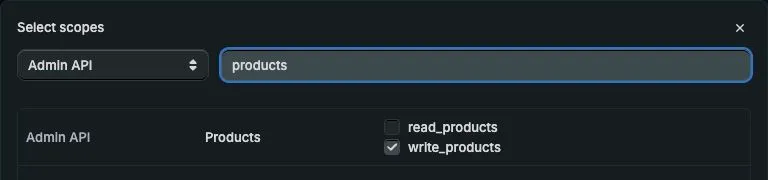
The example configuration supports product and inventory management, publishing, and read-only reporting:
| What the specialist can do | Scope |
|---|---|
| Read and update products and collections | write_products |
| Read and adjust inventory | write_inventory |
| Read store locations | read_locations |
| Read and manage product publication | write_publications |
| Read recent orders | read_orders |
| Read draft orders | read_draft_orders |
| Read fulfilment services | read_fulfillments |
| Read returns | read_returns |
| Read customers | read_customers |
| Read discounts and price rules | read_discounts, read_price_rules |
| Read reports and analytics | read_reports, read_analytics |
Copy this example only if those operations match your needs:
write_products,write_inventory,read_locations,write_publications,read_orders,read_draft_orders,read_fulfillments,read_returns,read_customers,read_discounts,read_price_rules,read_reports,read_analyticsA write scope includes its matching read access. For a reporting-only
specialist, replace write_products, write_inventory and write_publications
with their read_ equivalents. Omit other scopes that your specialist will not
use. Lifter’s tool permissions remain a separate control over the specialist’s
actions.
Add other scopes only for planned tasks. For example, updating customers needs
write_customers, creating discounts needs write_discounts, and uploading
files needs write_files. Order changes require permissions appropriate to the
specific operation. See Shopify’s scope reference.
If you need orders older than 60 days
Section titled “If you need orders older than 60 days”read_orders normally covers the last 60 days. Historical reporting also needs
read_all_orders, which requires Shopify approval.
- Follow Request access beside the scope settings.
- On API access requests, find Read all orders scope → Request access.
- Explain your actual use of older orders and submit the request.
- After approval, add
read_all_ordersalongsideread_ordersand release a version with that scope. An already connected store must approve the change through Lifter’s Reconnect flow.
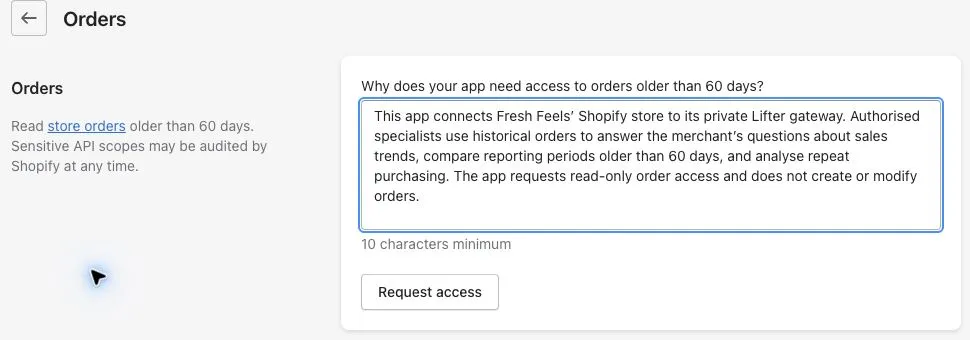
The screenshot shows an example explanation, not an approved request. Do not add the restricted scope to a version until Shopify grants access.
Customer names, email addresses, phone numbers and addresses have additional protected-data rules. A scope selection alone does not establish access to all of those fields. Check Shopify’s protected customer data requirements for your app and verify the fields your specialist actually needs.
4. Release the version and choose custom distribution
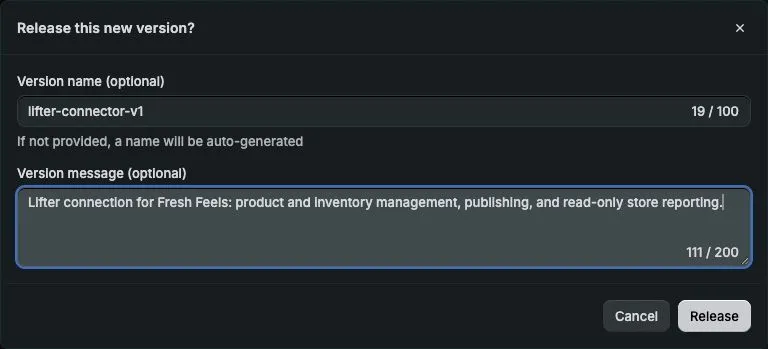
Section titled “4. Release the version and choose custom distribution”- Select Release on the version form.
- Add a version name, such as
lifter-connector-v1, and a short description. - Select Release in the confirmation dialog.
- Check that your version appears as Active under Versions.
Next, restrict where the app can be installed:
- Open the app’s overview by selecting its name in the sidebar.
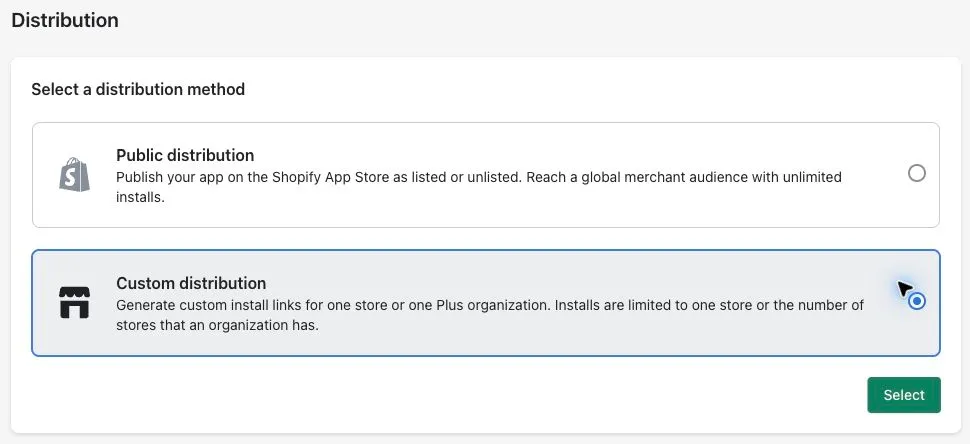
- Under Distribution, select Select distribution method. This may open the Partner Dashboard in another tab.
- Select Custom distribution, then confirm your choice. Shopify does not let you change the distribution method afterwards.
- Enter your store’s
myshopify.comdomain or itsadmin.shopify.com/store/...address. - Turn off Allow multi-store install for one Plus organization when this app is for one store.
- Select Generate link and confirm the store shown in the dialog.
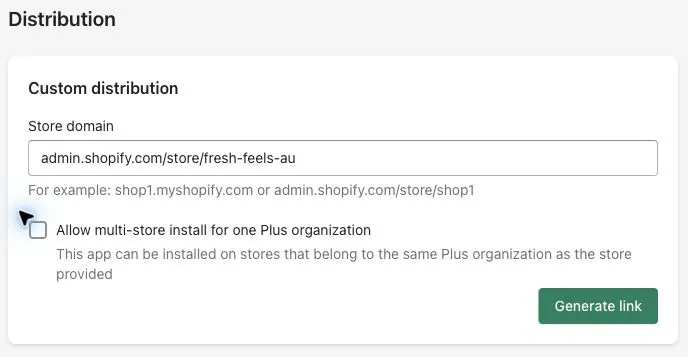
Keep the generated install link for the store owner or an authorised installer. Custom distribution does not put the app in the public Shopify App Store. See Shopify’s distribution guidance.
5. Add the app to your Lifter gateway
Section titled “5. Add the app to your Lifter gateway”Do this once as a Lifter administrator, before connecting the specialist.
- In the Shopify Dev Dashboard, open your app’s App settings.
- Under Credentials, locate Client ID and Secret.
- In your Lifter gateway, open Settings → Connectors.
- Find Shopify and select its configuration cog (Configure Shopify).
- Copy Shopify’s Client ID into Lifter’s Client ID field and Shopify’s Secret into Client secret.
- Leave App handle blank unless you know the app’s actual URL handle. It is optional and supplies the Manage in Shopify link; it is not the version name or the shop subdomain.
- Select Save and make sure the Shopify connector is enabled.
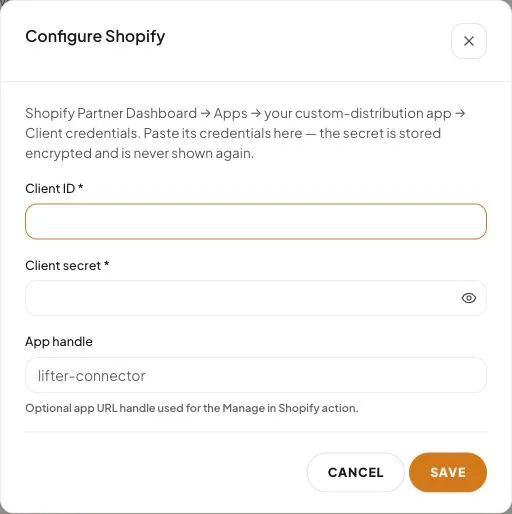
This image shows the live configuration form before credentials are entered. Keep the secret private; do not put it in a specialist conversation or a screenshot. Lifter stores it encrypted and does not display the saved secret again.
Saving these settings makes Install via Shopify available to specialists. It does not, by itself, connect a specialist to the store.
6. Install and connect the specialist
Section titled “6. Install and connect the specialist”- Open the custom install link from step 4 as a Shopify user who can install apps on the target store.
- Check the store, app name and requested permissions. Expand the permission groups to distinguish viewing data from changing it, then select Install. Return to Lifter if Shopify takes you to the app’s URL.
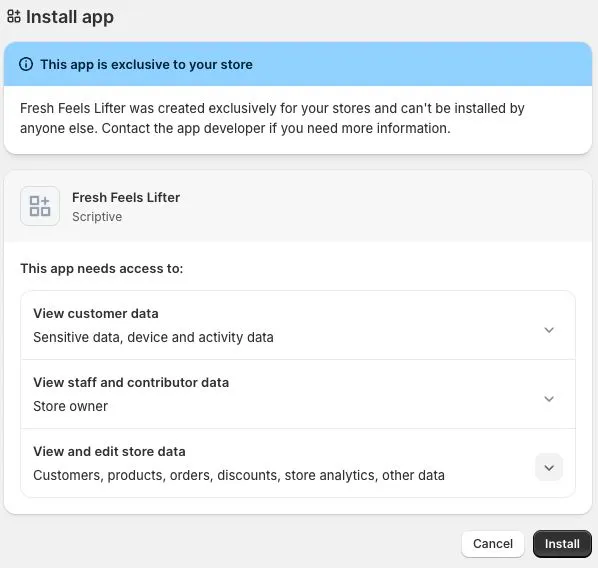
- In Lifter, open Specialists, choose your specialist, then open Connectors → Add connector, then select Connect on Shopify.
- Choose Install via Shopify. Keep Profile name as
defaultfor the first connection, or give it a name that distinguishes this store. - Enter Shop subdomain: only the part before
.myshopify.com. For example, enterfresh-feels-auforfresh-feels-au.myshopify.com. Use your own store’s value. - Select Install via Shopify and complete Shopify’s authorisation screen.
- On returning to Lifter, check that the specialist’s Shopify connection is active and points to the intended store.
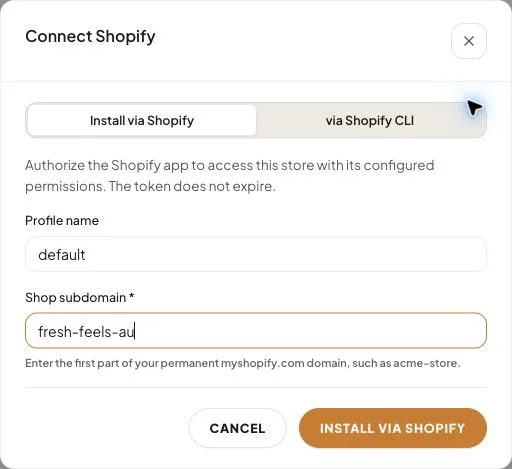
The app option asks for the shop subdomain. If you see Admin API access token and Refresh token, you are in via Shopify CLI mode. Switch to Install via Shopify; do not paste the app secret into a token field.
If Install via Shopify is missing, ask the gateway administrator to check the saved app credentials under Settings → Connectors → Shopify.
Check the connection
Section titled “Check the connection”Ask the specialist:
Use the Shopify connection to tell me the store name and list three product titles. Do not change anything.
Check that the result comes from the expected store. Then test the reads or changes that your specialist is intended to perform. Use a draft or disposable test product for a write test. A successful connection does not prove that every scope, protected field or reporting feature is available.
If something goes wrong
Section titled “If something goes wrong”| Symptom | What to check |
|---|---|
| Shopify rejects the redirect URL | The released version must contain the exact Lifter callback URL, with HTTPS and no trailing slash. |
| The app cannot be installed on this store | Check the store restriction under custom distribution and the installer’s permissions. |
| Shopify rejects a scope when releasing | Check its spelling and whether Shopify must approve it first. Leave restricted scopes out until approved. |
| The specialist cannot perform one operation | Check both the app’s granted scopes and the specialist’s tool permissions. |
| Older orders are missing | Check approval and consent for read_all_orders. |
| Customer fields are missing or access is denied | Check protected customer data eligibility and the specific fields requested. |
| You released more scopes but they still do not work | In Lifter, open the specialist’s Shopify connection and select Reconnect to authorise again. |
After changing scopes, release a new Shopify app version and reconnect the Lifter connection. Opening Manage in Shopify alone may return directly to Lifter without asking the merchant to approve the new permissions.